本文总结了展示型组件和容器型组件的差别,解释了为什么需要 React Redux 的connect()及其工作原理。
一、展示型组件与容器型组件
1.1 展示型组件
关注于“组件展示的外在形态是什么样的”;
内部可能会包含展示型组件和容器型组件,通常会有一些DOM标签和样式;
不依赖于应用的其余部分,如 Flux 的
action和store;很少有自己的state,如果有,则是 UI state, 而不是数据;
一般可以用
function手动编写,除非需要state, 生命周期钩子,性能优化等就用class。
1.2 容器型组件
关注于“组件是如何运转的”;
内部可能包含展示型和容器型组件,但是一般不会有DOM标签(除了用于包裹的div标签)和样式;
为展示型组件或其他容器型组件提供数据和行为;
调用Flux actions,并以回调的形式提供给展示型组件;
通常是有状态的,通常作为数据来源;
一般通过高阶组件来产生,例如:React Redux 的
connect(), Relay 的createContainer(), Flux Utils 的Container.create(), 而不是手动编写。(参见本文第六部分)
1.3 表格总结
| 展示型组件 | 容器型组件 | |
|---|---|---|
| 功能 | 决定程序如何显示(模板,样式) | 决定程序如何运作(数据获取,状态更新) |
| 是否连接 Redux | 否 | 是 |
| 读取数据 | 从props中读取 |
订阅 Redux 的state |
| 更新数据 | 调用来自props的回调函数 | 发起 Redux 的 action |
| 生成方式 | 手动编写 | 大多通过 react-redux 自动生成 |
1.4 将组件分为这两类的好处
关注点分离。这样编写组件可以让你更好地理解你的应用和UI;
更好的复用性。你可以使用同一个展示型组件,给它完全不同的数据来源,将这些封装成独立的容器型组件,可进行更广泛地复用;
展示型组件实质上是你的应用的“调色板”。你可以将其放在一个单页面上,设计师就可以调整它的样式,而不用接触到应用的逻辑。你也可以在这个页面上运行截图回归测试。
强制你将布局组件(如,Sidebar, Page, ContextMenu)抽离出来,在其他容器型组件中使用
this.props.children引入,而不是复制同样的标签和布局。补充说明:
将组件分为这两类是React与Redux开发的最佳实践,但这个约定并非需要死板地遵循:
containers目录中也可能放置没有连接Redux的组件,因为有些页面就是不需要连接Redux但它仍然是其他组件的容器;
components目录中也可以放置连接Redux的组件,比如 ReduxForm 生成的表单组件。
但绝大多数情况下,都应将 Redux 连接在组件顶层,不让里面的组件感受到 Redux 的存在。
二、什么时候需要容器型组件?
如果你需要从上而下传递很多的props,而传递过程中,有些中间组件并不需要使用这些props,仅仅是把它们继续往下传递(因为props只能逐级传递),每当你的目标子组件需要新数据时你就得再次经过这些中间组件,这时需要引入容器型组件来解决这个问题。
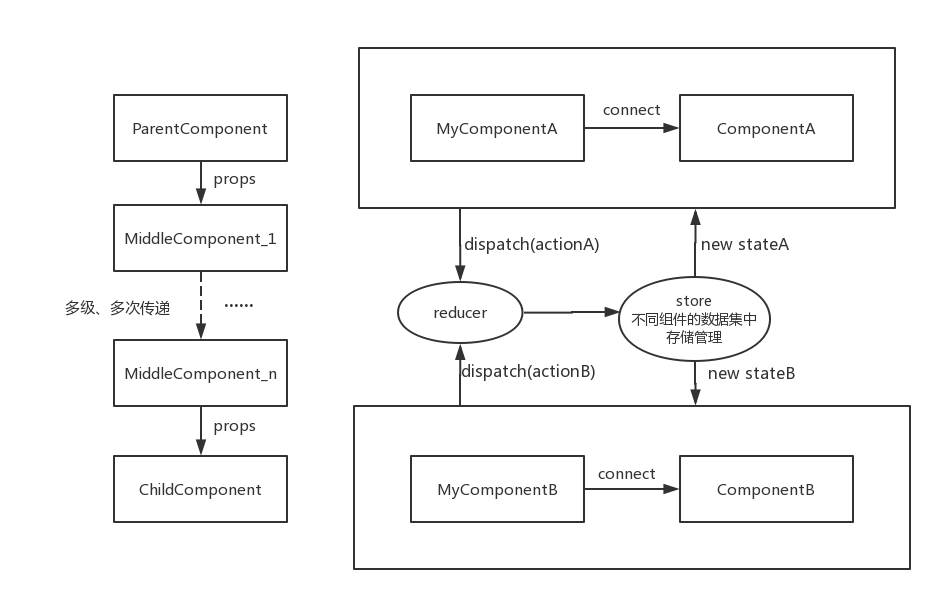
容器型组件会将 Redux store 中的数据连接到展示组件。(参见本文第三部分)
三、如何生成容器型组件
3.1 Redux基本用法
通过 reducer 创建一个 store,每当我们在 store 上 dispatch 一个 action,store 内的数据就会相应地发生变化。
|
|
这种方法的不好之处在于:
无法直接给子组件传递
state和方法;任意
state的变化都会导致整个组件树的重新渲染。(可能需要为了性能优化而手动实现 React 性能优化建议 中的shouldComponentUpdate方法。)
3.3 方法二:使用 react-redux 连接
3.3.1 用法
主要是 Provider 和 connect的使用。
将所有内容包裹在Provider中,并将store作为prop传递给Provider :
|
|
Provider中的任何组件(比如Comp),如果要使用state中的数据,要求Comp是被connect方法包装过的组件(容器型组件):
|
|
注意:推荐使用react-redux而不是手动编写来生成容器型组件。因为connect()方法做了性能优化来避免很多不必要的重复渲染。
3.3.2 connect的参数
connect(mapStateToProps, mapDispatchToProps, mergeProps, options)
1) mapStateToProps函数
(state, ownProps) => stateProps
将store中的数据作为props绑定到组件上:
- 第一个参数
state是 Redux 的store
|
|
绑定后,组件MyComp可以通过this.props访问到store中的数据:
|
|
- 第二个参数
ownProps是原组件MyComp自身的props。有时会用到,比如,当你在store中维护了一个用户列表,而你的组件MyComp只关心一个用户(通过props中的 `userId体现):
|
|
当state或者ownProps变化的时候,mapStateToProps都会被调用,计算出一个新的 stateProps,(在与ownProps merge 后)更新给MyComp。
2) mapDispatchToProps
(dispatch, ownProps) => dispatchProps
将action作为props绑定到MyComp上。
|
|
Q:为什么不直接将action对象传递给MyComp组件,而要传递函数increase和decrease,包装dispatch分发该action的过程?
A:为了不让MyComp组件感知到dispatch的存在,将action包装成可以直接被调用的函数。Redux的bindActionCreators函数也可以做到:
|
|
函数bindActionCreators(actionCreators, dispatch)会返回一个对象,该对象中的每个函数都可以直接dipatch相应的action。
3) mergeProps
(stateProps, dispatchProps, ownProps) => props
将前面两个函数生成的stateProps和dispatchProps,与原组件MyComp原有属性ownProps合并后赋给MyComp.通常情况下,如果不传这个参数,connect会默认使用Object.assign()替代这个方法。
四、Provider和connect的工作原理
4.1 Provider
Provider是个 React 组件,它通过context而不是props将store传递给子组件,所以可以跨级传递。下面是它的部分源代码:
node_modules/react-redux/src/components/Provider.js
|
|
4.2 connect
Connect是一个嵌套函数,运行connect()后,会生成一个高阶组件,该高阶组件接收一个组件作为参数再次运行,会生成一个新组件(connect组件)。
connect组件从context中获取来自Provider的store,然后从store获取state和dispatch,最后将state和经过dispatch加工过的action创建函数连接到组件上,并在state变化时重新渲染组件。
react-redux所做的性能优化:如果一个页面有多个被connect()连接的组件,这些组件只会在自己对应的state变化时重新渲染(重新渲染前会检测传入组件的数据是否变化,如果没变化就不会执行旋绕),所以不组件的数据如果用connect()隔离开,它们的渲染不会相互干扰。
如下简单列出它的部分源码(主要是看出高阶组件):
node_modules/react-redux/src/components/connect.js
|
|
五、补充:一些对立词汇的解释
1 “有状态(stateful)”与“无状态(stateless)”
某些组件会使用React的setState()方法,而有的组件不用。
容器型组件倾向于是“有状态”的,展示型组件倾向于是“无状态”的,但这也不是绝对的。
2 class 与 function
二者都可以用于定义组件。
用函数定义组件更简单和易于理解,但是缺少某些只对class可用的特性,比如state, 声明周期钩子,性能优化。将来有可能会减少这些限制。
3 “纯净(pure)”与“非纯净(impure)”
“纯净的”组件:对于相同的
props和state, 总是输出同样的结果。组件纯净与否与其定义方式和有无状态无关。
纯组件不依赖于其
props和state的变化,因此它们的渲染性能可以在shouldComponentUpdate()钩子函数中浅对比(shallow comparison)来优化。
这里简要介绍一下浅对比:
ES6类使用React时,使用shallowCompare完成和PureRenderMixin相同的功能:如果组件的绘制函数是“纯净的”,可以使用这个辅助函数在某些情况下提升性能。
对props和nextProps对象,state和nextState对象的键值key分别进行迭代比较,在key值!==时,shouldComponentUpdate()函数就返回true,说明组件应该更新。
参考资料
《React与Redux开发实例精解》,刘一奇著,电子工业出版社,2016.11